

Often times, a digital assistant must execute on logic that can’t be written in the YAML or in a Q&A and should therefore use a custom component. Some use cases for a custom component might be: sending an email to the user or bot administrator, making an API call with user input, or connecting to an external data source to return user’s information. As a general rule, custom components should be used any time the assistant is dealing with dynamic information and logic, or for specific actions that are outside the built-in program’s abilities.
This post will walk you through building a custom component. If you’d like, you can us Oracle’s documentation (as of Dec 2018): https://docs.oracle.com/en/cloud/paas/autonomous-digital-assistant-cloud/use-chatbot/bot-components.html#GUID-268C35B3-57B3-4E52-BEEC-1DEE7CA0ACFB
There are actually three ways to implement a custom component in Oracle Digital Assistant:
- Embedded Container
- Mobile Cloud
- Node JS Server
In this example we’ll walk through using an embedded container.
Deploy to an Embedded Container
The simplest way to deploy a custom component is via an embedded container.
Copy the files from oracle’s example on github: https://github.com/oracle/bots-node-sdk/tree/master/examples/custom-components/starter/custom
The file structure should look like this (you can ignore copying the node modules as they will auto install in the next steps):
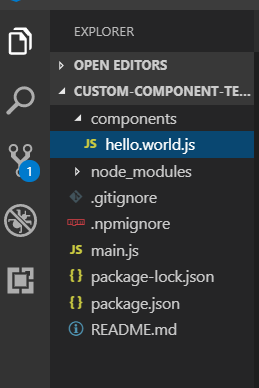
Oracle’s template includes a component file called hello.world that will respond to a user by returning the user’s metadata and today’s date like this:

The hello.world file executing this logic in the component looks like this:
Code Snippet of hello.world.js
module.exports = {
metadata: () => ({
name: ‘hello.world’,
properties: {
human: { required: true, type: ‘string’ },
},
supportedActions: []
}),
invoke: (conversation, done) => {
// perform conversation tasks.
const { human } = conversation.properties();
conversation
.reply(`Greetings ${human}`)
.reply(`Today is ${new Date().toDateString()}`)
.transition(‘complete’);
done();
}
};
This is obviously a contrived example, but it is a good way to upload your first component in an embedded container and test if it’s properly connected to your assistant/bot. Then you can use the same structure to create a new component file that has your own custom logic. The first step is to upload the template code to your digital assistant following this process:
- Clone the repo or copy the component file structure from the Oracle’s template repo above and run: npm install
- Then run the command: npm pack
- This creates a .tgz file that you will upload to the bot
- In your bot navigate to the components tab and click add service
- Name it whatever you like and choose embedded container – select the .tgz file to upload
- It should successfully upload and you will see you new embedded container with its world component listed (you may have to refresh the browser)
Here I added it to the pizza bot and you can see the component listed along with an age checker component that already existed:
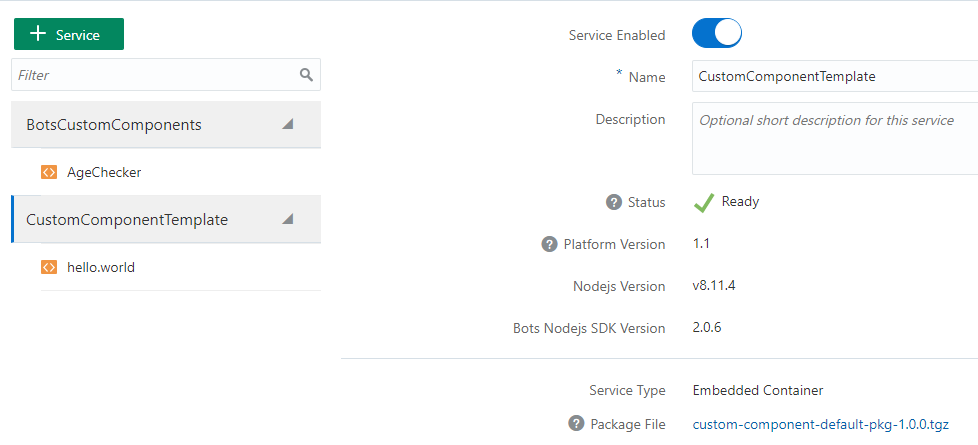
*Note the service toggle is on and the you can see .tgz file is in fact uploaded as a package file.
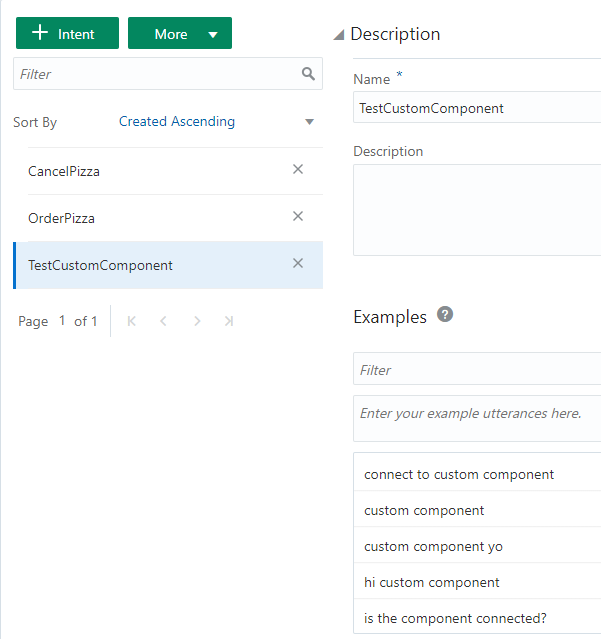
Once the embedded container is uploaded all you need to do is configure the bot to call the custom component with a new or existing intent. In this case I’ll create a new intent in the PizzaBot and set a state to call the hello.world component I just uploaded.
I’ll create a new intent called TestCustomComponent and add utterances (very original I know)
Add the intent and state to the yaml in the bot platform:
metadata:
platformVersion: “1.0”
main: true
name: “PizzaBot”
parameters:
age: 18
context:
variables:
size: “PizzaSize”
type: “PizzaType”
crust: “PizzaCrust”
iResult: “nlpresult”
states:
intent:
component: “System.Intent”
properties:
variable: “iResult”
transitions:
actions:
OrderPizza: “resolvesize”
CancelPizza: “cancelorder”
unresolvedIntent: “unresolved”
TestCustomComponent: “testComponent”
testComponent:
component: “hello.world”
properties:
human: “${profile.firstName}”
transitions:
return: “done”
Note in the testComponent State the component is set to hello.world and the properties include the user’s profile.firstName
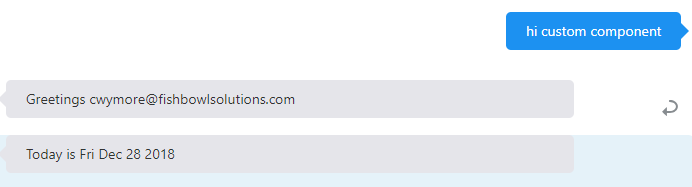
Validate and Train the bot
That’s It! Now when you ask the bot any of the utterances of the new intent, it should respond with the hello.world component’s answer:
Add Custom Logic to Component
Now let’s use the same principles to create new component file with our own custom logic that will check if we can deliver pizza depending on a person’s entered address.
To do that, let’s first create a new file in the components folder called checkAddress.js. Then, copy the hello.world contents into the new file so checkAddress looks like this:
checkAddress.js – code snippet
‘use strict’
module.exports = {
metadata: () => ({
name: ‘checkAddress’,
properties: {
human: { required: true, type: ‘string’ },
},
supportedActions: []
}),
invoke: (conversation, done) => {
// perform conversation tasks.
const { human } = conversation.properties();
conversation
.reply(`Greetings ${human}`)
.reply(`Today is ${new Date().toDateString()}`)
.transition(‘complete’);
done();
}
};
Right now it’s exactly the same as hello.world except the name. In theory we could run the npm pack command, upload the new .tgz file and we would have our second component – it would just be doing the same thing as hello.world. So now, let’s modify the new file by adding check address logic. To do that, replace everything in the invoke function with the following logic:
checkAddress.js with new logic – code snippet
// perform conversation tasks.
//set user metadata variable
const { human } = conversation.properties();
//set user address variable
var userInput = conversation.variable(“userAddress”);
//check if user address contains the city Minneapolis
var regexAddress = (/Minneapolis/);
var isValidAddress = regexAddress.test(userInput);
if (isValidAddress){
conversation
.reply(‘Yes! looks like we deliver to you address’);
}
else {
conversation
.reply(`Sorry ${human}, we only deliver to addresses in Minneapolis, MN`);
}
conversation.transition();
done();
So now hopefully you can see instead of just saying todays date like in hello.world, the new component looks for the user’s entered address to see if they live in Minneapolis. It does so by establishing a userInput variable which is set to userAddress. In the next steps I’ll declare the userAddress variable in the yaml.
Now run npm pack and upload the newly created tgz file to the pizza bot. You’ll see the new component file listed under our previous hello.world (you might need to refresh the browser). Now that the component is uploaded in the embedded container, let’s modify the assistant so users can ask about pizza delivery locations.
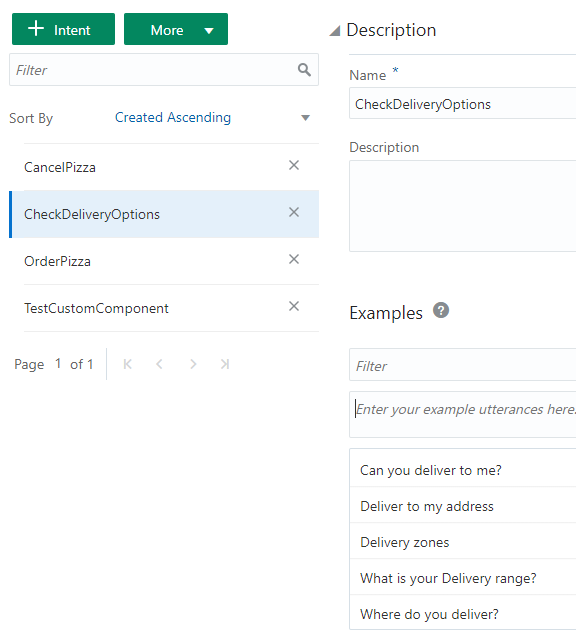
Add a new intent called CheckDeliveryLocations with appropriate utterances:
Likewise in the yaml, create the states to prompt a user for their address so we can check if they live in Minneapolis:
context:
variables:
size: “PizzaSize”
type: “PizzaType”
crust: “PizzaCrust”
iResult: “nlpresult”
userAddress: “string”
states:
intent:
component: “System.Intent”
properties:
variable: “iResult”
transitions:
actions:
OrderPizza: “resolvesize”
CancelPizza: “cancelorder”
unresolvedIntent: “unresolved”
TestCustomComponent: “testComponent”
CheckDeliveryOptions: “askForAddress”
testComponent:
component: “hello.world”
properties:
human: “${profile.firstName}”
transitions:
return: “done”
askForAddress:
component: “System.Text”
properties:
prompt: “Looks like you want to know if we can deliver to you. Please type in the address you want a delivery to and we’ll look that up!”
variable: “userAddress”
transitions:
next: “testComponentAddress”
testComponentAddress:
component: “checkAddress”
properties:
human: “${profile.firstName}”
transitions:
return: “done”
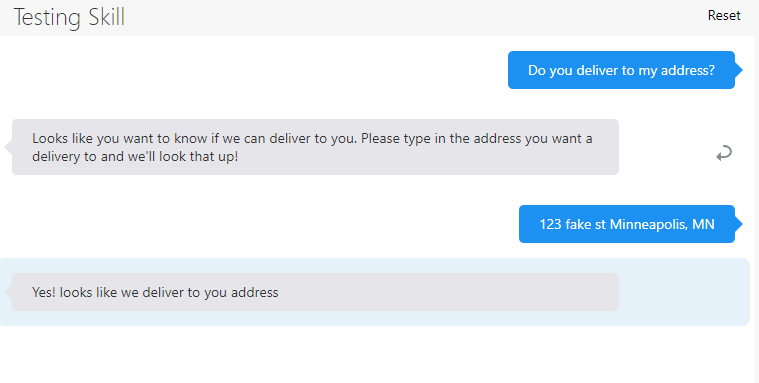
There are actually two states. The askForAddress state does just that and prompts for the user’s address and sets their input as the userAddress variable. Once that is set our custom component for the Oracle Digital Assistant will have access to that data. The second state is the TestComponentAddress that only calls the checkAddress component we uploaded earlier. So our new custom component in action looks like this:
Congratulations! You just created a custom component for the Oracle Digital Assistant and uploaded it to an embedded container. A couple of notes. Our component is only using a regular expression to see if a user is typing ‘Minneapolis’. In practice you’d want to use a more sophisticated approach to determine their location such as geolocation, but all of that logic can live in the component file you just created. Also, you’ll want to define states to get out of the logic of the custom component and notify the user the conversation is over. Now you know how embedded containers work and can add any custom logic you want to your assistants.